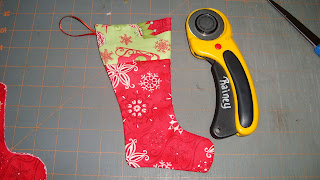
This past week I worked very hard to get my annual ornament completed. With the help of my Mum I was able to get them sewn up and most of them sent out. I think they came out pretty cute.
To make these little cuties you need one charm pack, 1/2 yd of coordinating fabric and my Stocking Pattern. You will also need 48 inches of ribbon cut into 4 inch lengths. (not pictured.) This will make 12 little stockings.
Fold your fabric so you have 6 layers. The selvage should be at the top.
Use your scissors and cut out the first set. Then you will re-pin the pattern and repeat 3 more times.
Now you have a stack of cut our stocking shapes.
Choose 12 sets of coordinating charm squares. Because I am using one charm pack I don't have matching tops but I tried to choose ones with the same primary color for each set. I think this adds to the versatility of the stocking. You can hang it on the tree either way.
Fold the squares in half.
Center them on the top of your stocking piece. Sew across with a 1/4 inch seam.
Do the same with the coordinating charm square on the reverse of the stocking piece. You should have a set like this when you are done. They are basically a mirror image. Do this step with all your stocking pieces.
Iron each piece pressing away from the stocking body. Go ahead and press all your stockings.
I am sorry but this picture is not quite right. I finished all of mine before I realized that my picture was incorrect. I am going to explain the proper way to trim these up. The theory above is right. The only difference is you are going to take the two mirror stocking pieces and place them face to face (pretty sides of fabric touching) before you trim. The picture shows them stacked properly. It is just hard to see that there are two stocking units there. I try to angle my cut a little outward if possible so I can have a tiny flair at the top of the stocking.
Now after you trim you should have two mirror pieces stacked on top of one another ready to sew.
Place your piece of 4 inch ribbon between the two layers and pin in place. This is your hanger. Pin the rest of the way around your stocking.
Sew around the edges leaving the top open.
You are almost done. It is looking great.
This step is very important to make your stocking look nice and smooth. Make little snips around the edges on all the curved areas. make sure not to cut too close to your stitching. Only snip about an 1/8 of an inch in.
Turn your stocking right side out and press. Yay! You now have a great ornament for your tree. Or, you can fill with candy and give to a neighbor or friend.
The first person who makes this ornament and sends me a picture along with any pattern corrections. I will mail you a fat quarter of your choice.


These are adorable!!! Thanks for tutorial.. I will put them on my to-do list for next year ;)
ReplyDeleteStef
www.itsallinmyheadstefsblog.blogspot.com
These are super cute! Thanks for the blog visit and good luck with your towels :)
ReplyDelete